Stepping into your RV should be effortless and secure, but for many adventurers, the reality is wobbly, worn, or even missing steps. Whether you’re grappling with an aging rig or simply seeking an upgrade, tackling RV step installation, replacement, and DIY projects can transform your travel experience. This isn't just about aesthetics; it's about safety, accessibility, and peace of mind on the open road.
At a Glance: Your Quick Guide to Better RV Steps
- Why it Matters: Stable steps prevent falls, improve accessibility for all ages and mobilities, and boost your RV’s functionality.
- Decide Your Path: Choose between simple repair, a full replacement with modern units like SolidSteps, or a custom DIY build for unique needs.
- Replacing Steps: Involves careful measurement, removing old steps, installing new brackets, securing the unit, and sealing mounting points.
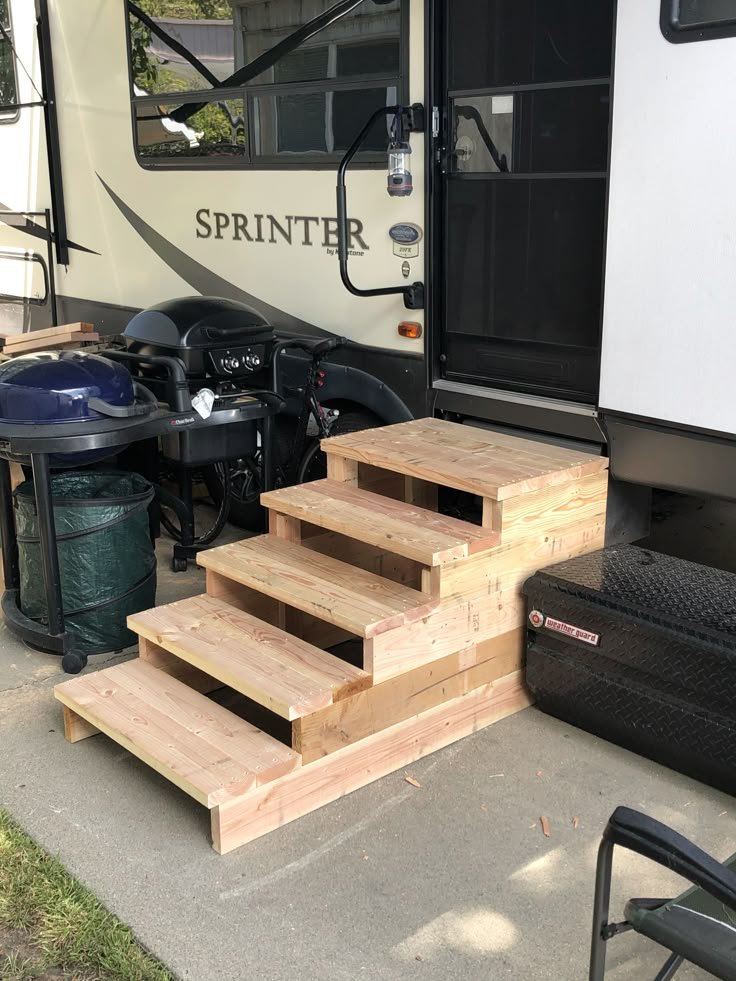
- DIY Steps: A cost-effective solution for custom sizing, often using durable wood, with emphasis on sturdy construction, non-slip surfaces, and protective finishes.
- Maintenance is Key: Regular cleaning, lubrication, and inspection extend the life of any RV step system, commercial or custom.
- Safety First: Always use appropriate PPE, work on level ground, and confirm structural integrity.
Why Your RV Steps Matter More Than You Think
Imagine pulling up to a picturesque campsite, only to struggle getting in and out of your RV because of flimsy, damaged, or unsuitably high steps. It's a common scenario that quickly dampens the joy of travel. Your RV steps are often the first point of contact with your mobile home, serving as a critical gateway for you, your family, and even your pets.
Beyond the immediate convenience, sturdy, well-maintained steps are a non-negotiable safety feature. Falls due to unstable footing are a leading cause of injury around RVs. For those with mobility challenges, young children, or older pets, a secure and appropriately sized step is the difference between an accessible adventure and a frustrating barrier. Investing in your RV steps, whether through repair, replacement, or a custom build, is investing in everyone's safety and comfort.
Deciding Your Next Step: Repair, Replace, or DIY?
Before grabbing your toolkit, take a moment to assess your current situation. Your existing steps might just need a little TLC, or perhaps it's time for a complete overhaul. This decision framework can help you navigate the options.
When to Opt for a Simple Repair
Sometimes, the problem is minor. Your steps might be perfectly functional but suffer from a few easily fixable issues.
- Loose Hardware: If your steps feel wobbly but are otherwise intact, check and tighten all bolts, screws, and fasteners. Vibration from travel can loosen connections over time.
- Worn Tread: The anti-slip surface on your steps can wear down, becoming slick and dangerous, especially when wet. Replacement grip tape or non-slip strips are inexpensive and simple upgrades.
- Sticking Mechanisms: Folding steps can become stiff or squeaky. A thorough cleaning and a good silicone-based lubricant can often restore smooth operation.
- Minor Bends or Dents: Small structural imperfections that don't compromise safety can sometimes be straightened or reinforced.
When a Full Replacement is the Smartest Move
If your steps are significantly damaged, rusting through, or fundamentally inconvenient, a full replacement is usually the best course.
- Extensive Damage: Rust, broken welds, cracked mounting brackets, or severely bent frames mean the structural integrity is compromised. Don't risk it.
- Outdated Design: Older RVs often have steps that are too high, too narrow, or prone to excessive bounce. Replacing them with modern options (like SolidSteps, discussed below) can dramatically improve stability and ease of use.
- Seeking an Upgrade: You might want features your current steps lack, such as auto-retraction, greater weight capacity, or built-in lighting.
- Safety Concerns: If you constantly worry about someone slipping or falling, it's a clear sign for an upgrade.
When to Embrace the DIY Spirit
Building your own RV step isn't just about saving money; it's about customization, durability, and a sense of accomplishment.
- Specific Sizing Needs: If your RV has an unusual doorway height or a particularly high initial step that commercial units don't quite address, a custom build ensures a perfect fit.
- Budget Constraints: High-quality commercial steps can be a significant investment. A DIY wooden step, while requiring time and effort, can be substantially more affordable.
- Durability and Robustness: Many DIY enthusiasts find that a well-built wooden step can outperform some mass-produced options in terms of sturdiness and longevity, especially when properly maintained for outdoor use.
- Unique RV: For vintage campers or custom builds, a handcrafted step often complements the aesthetic better than a generic store-bought unit.
Route 1: Replacing Your RV Steps with a Modern System (e.g., SolidStep)
Modern RV step systems, often referred to as "ground-referencing steps" like the popular SolidStep, have revolutionized entry and exit. These steps don't rely solely on your RV's frame for support but extend to the ground, providing exceptional stability.
The Clear Advantages of Ground-Referencing Steps
These systems offer superior stability, significantly reducing the "bounce" and sway often associated with traditional folding steps. This makes them particularly beneficial for individuals with limited mobility, those carrying heavy items, or anyone who simply appreciates a rock-solid entry. They feel more like climbing stairs in a house than a ladder into a vehicle.
Crucial Pre-Installation Checks: Measure Twice, Buy Once
Before you even think about purchasing a new step unit, accurate measurement is paramount.
- Door Opening Dimensions: Measure the width of your RV's door frame. Every step manufacturer will list the compatible door widths for their models. This is non-negotiable.
- Ground-to-Doorway Distance: With your RV parked on a level surface, measure the distance from the ground to the bottom of your RV's door frame. This helps you select a step system that deploys to an appropriate height, minimizing the "first step up" distance.
- Compatibility: Always refer to the manufacturer’s instructions and specifications to confirm your RV’s specific model and door configuration are compatible with the step unit you intend to buy.
Tools & Materials You’ll Need
Gathering everything beforehand saves time and frustration.
- Your new SolidStep unit (or similar ground-referencing step)
- Mounting hardware (screws, bolts – usually included)
- Exterior-grade, UV-resistant sealant (specifically for RVs)
- Tape measure
- Drill (with appropriate bits for metal/wood)
- Wrenches or sockets
- Level
- Pry bar (optional, for stubborn old steps)
- Marking pencil
- Silicone-based lubricant (for future maintenance)
- Safety glasses and work gloves
Step-by-Step Installation Guide for Modern RV Steps
This process assumes you're replacing existing steps, but the core installation for a new opening is similar after initial framing.
- Prep & Gather: Lay out all your tools and the new step unit. Read the manufacturer's instructions thoroughly – they may have model-specific nuances.
- Saying Goodbye to the Old Steps: Most existing RV steps are bolted or screwed directly into the RV's frame, often beneath the door threshold. Carefully unscrew or unbolt them. You might need a pry bar for steps that are stuck or heavily sealed, but work gently to avoid damaging your RV's frame.
- Doorway Deep Dive: Once the old steps are removed, clean out any debris, old sealant, or rust from the doorway opening. Inspect the RV frame itself for any signs of rust, cracks, or damage. It's crucial that the mounting area is structurally sound. Address any issues before proceeding.
- Measure Twice, Drill Once: Refer to your new step unit's manufacturer instructions for precise mounting point dimensions. Carefully measure your doorway opening again, then use your pencil to mark the exact locations where the mounting brackets will attach to the RV frame. Precision here prevents a wobbly installation later.
- Brackets First: Align the SolidStep (or similar) mounting brackets with your marked points. Use your drill to pre-drill pilot holes. Then, securely attach the brackets using the provided screws or bolts. Use your level to ensure the brackets are perfectly horizontal and properly aligned. This alignment is critical for the steps to operate smoothly.
- Introducing Your New Steps: This is often a two-person job due to the weight and size. Lift the new step unit and position it onto the attached brackets. Once aligned, secure the unit using the remaining provided hardware. Tighten all bolts and screws firmly but avoid over-tightening, which can strip threads.
- The Grand Performance Test: With the steps securely mounted, extend and retract them several times. Check that they move smoothly, lock securely in both positions, and that the adjustable legs (if applicable) extend properly to the ground. Look for any instability, binding, or misalignment. Make any necessary fine-tune adjustments to the brackets or hardware now.
- Seal the Deal: This is a vital, often overlooked step. Apply a continuous bead of exterior-grade, UV-resistant sealant around all mounting brackets and any new screw or bolt holes you created. This prevents water intrusion, which can lead to rot, rust, and costly damage to your RV's frame. Allow the sealant to cure completely according to its instructions. Finally, inspect the installed steps for any sharp edges or potential hazards.
For those curious about the broader spectrum of RV entry solutions, you can explore All about RV steps to understand the various types and their respective benefits.
Troubleshooting Common Installation Hiccups
Even with careful planning, things can sometimes go awry.
- Step unit doesn't quite fit: Double-check your initial measurements against the manufacturer's specifications. Sometimes minor adjustments to bracket positioning (within allowable tolerances) can resolve slight discrepancies.
- Steps feel wobbly: Re-tighten all bolts and screws, ensuring they are snug. Inspect the mounting brackets for damage or bending, and re-verify the structural integrity of your RV's frame where the steps are attached.
- Steps don't retract smoothly: This is often due to friction. Lubricate all moving parts and pivot points with a silicone-based lubricant. Also, check for any obstructions that might be preventing full retraction.
- Hardware missing from the box: Immediately contact the manufacturer or retailer for replacements. Never substitute with inferior hardware, as this can compromise safety and void warranties.
Ongoing Care for Your New Steps
To ensure your new steps last for years of adventures, regular maintenance is key.
- Clean Regularly: Wipe down the steps with mild soap and water to remove dirt, mud, and road grime. Pay attention to the tread and moving parts.
- Lubricate Moving Parts: Every few months, or as needed, apply a silicone-based lubricant to hinges, pivot points, and any sliding mechanisms. This keeps them operating smoothly and quietly.
- Inspect for Wear: Periodically check for loose hardware, damaged tread, or any signs of rust or structural fatigue. Address minor issues before they become major problems.
Route 2: Building Your Own Custom RV Step (The DIY Wood Wonder)
For those who love a hands-on project and crave a step tailored to their exact needs, building your own can be incredibly rewarding. It’s also often a more robust and cost-effective alternative to many commercial options, especially if you prioritize stability and custom fit.
Why Go DIY? The Benefits of a Custom Step
A custom-built wooden step offers several compelling advantages:
- Perfect Fit: You dictate the dimensions (height, depth, width) to perfectly suit your RV's doorway and the ground level at your typical campsites. This is especially useful for high-rise RVs or older models.
- Exceptional Durability: By choosing high-quality, outdoor-grade wood and applying robust finishes, you can create a step that stands up to the elements far better than some pre-fabricated alternatives.
- Cost-Effectiveness: Often, the materials for a sturdy wooden step are significantly less expensive than a commercial replacement unit.
- Stowability: A well-designed wooden step can be easily picked up and stowed inside your RV, protecting it from theft or harsh weather during travel.
Design Principles for a Stellar DIY Step
Think about how you'll use it. Here are some guidelines based on successful DIY builds:
- Ideal Dimensions:
- Height: Aim for a rise under eight inches. For instance, a common recommendation is 8 ¾” high. This makes stepping up manageable for most people.
- Depth: A 10” deep step provides ample foot room and stability.
- Width: A 24” width is generally practical; it accommodates common handi-panels of wood and fits through most RV doorways for easy storage. Wider options (like 27”) might be too cumbersome.
- Material Selection: Crucially, avoid cabinet-grade plywood as it's not designed for outdoor exposure. Opt for durable, weather-resistant woods like pressure-treated lumber, cedar, or quality pine that will be heavily sealed.
- Stability is Paramount: The design should prevent wobble. Ensure supports are well-placed and consider adding rubber feet or strips to the bottom to adapt to uneven terrain.
- Safety Features: Incorporate non-slip surfaces and smooth all edges, especially on handholds.
Tools & Materials for Your Wooden Step Project
You'll need a mix of woodworking basics and finishing supplies.
- Wood: Your chosen outdoor-grade wood (e.g., pine boards, often found as "handi-panels")
- Cutting Tools: Worm drive circular saw or table saw (for straight, precise cuts). An oscillating tool or jigsaw for handle cutouts.
- Drill: For pilot holes and screws.
- Sander: Palm sander or sandpaper (120-150 grit for initial sanding, finer for finishing).
- Router (optional): For rounding edges, especially handholds, for comfort.
- Wood Glue: Exterior-grade wood glue.
- Fasteners: Screws (pre-drill to prevent splitting) or brads for assembly.
- Polyurethane: Exterior-grade, clear polyurethane sealant (3 coats recommended).
- Outdoor Paint (optional): High-quality, oil-based exterior paint (2 coats) for added protection.
- Non-Slip Grip Tape: High-quality, outdoor-rated grip tape (e.g., 3M).
- Stapler: Heavy-duty stapler for securing grip tape and neoprene.
- Neoprene Rubber Strips: For the bottom edges of the step.
- Safety Glasses & Gloves: Always.
Step-by-Step DIY Wood Step Construction
This guide will walk you through building a single, sturdy, storable wooden step.
- Precision Cutting: Begin by cutting all your wooden pieces to size. For a step that's 8 ¾” high, 10” deep, and 24” wide, you'll typically need:
- One top board (24” x 10”)
- Two side supports (approx. 8 ¾” x 8 ¼”, depending on material thickness)
- Two base supports (approx. 22.5” x 8 ¼”)
- Expert Tip: Use a square to ensure all cuts are perfectly straight.
- Crafting Comfortable Handles (Optional but Recommended): If you plan to carry your step, handles are a game-changer.
- On the top board, mark points for your handles, biased slightly towards the center for comfortable one-hand carrying. For example, drill 1 ½” holes at 5” and 8” from the center.
- Use an oscillating tool or jigsaw to cut straight lines between these holes, creating rectangular slots (e.g., 4.5” x 1.5”).
- After cutting, use a router or sandpaper to smooth all edges, especially the handholds, to prevent splinters and provide a comfortable grip.
- Smoothing the Way: Before assembly, sand all cut pieces with medium-grit sandpaper (120 or 150 grit). This prepares the wood for glue and finish, making the final product much smoother and more professional.
- The Art of Assembly:
- Mock-Up First: Always perform a dry fit (mock-up) of all pieces before applying glue or fasteners. This helps catch any errors in cutting or design.
- Build the Base: Start with the base structure. Apply wood glue sparingly but thoroughly (brush it onto edges) and then secure with screws (pre-drill pilot holes to prevent splitting). Ensure any internal supports for the top board do not extend to the ground; this is crucial for stability on uneven surfaces.
- Attach the Top: Once the base is solid, apply glue to the top edges of your assembled base, then position and fasten the top board. Wipe away any excess glue immediately, as dried glue can prevent polyurethane from adhering properly.
- Flawless Finish:
- Initial Sanding: After assembly, lightly sand any exterior surfaces again with medium-grit sandpaper.
- Polyurethane: Apply three full coats of exterior-grade polyurethane to all surfaces, including the bottom. Allow adequate drying time between coats and perform a very light sanding (e.g., 220 grit) between each coat for maximum smoothness and adhesion. Polyurethane will darken the wood, enhancing its natural grain.
- Optional Paint: For ultimate outdoor protection and a specific aesthetic, after the polyurethane has fully cured (check manufacturer's recommendations, usually several days), you can apply at least two coats of high-quality outdoor oil-based paint.
- Grip It Good: Safety is paramount. Apply high-quality non-slip grip tape to the top surface. Lengthwise strips are effective, and you don't need full coverage—just enough to ensure secure footing. Crucially, staple the ends of the grip tape to prevent peeling over time, especially with heavy use and weather exposure.
- Bottom-Up Protection: Flip your finished step over. Attach neoprene rubber strips to the two short ends on the bottom using your stapler. These strips serve multiple purposes: they protect the wood edges from moisture, reduce wobble by allowing the step to slightly conform to uneven ground, and prevent the step from sliding on smooth surfaces. Staple generously, especially at the ends.
DIY Step Maintenance
A custom step requires ongoing care. Re-apply polyurethane or paint every 1-2 years, depending on exposure, to maintain its weather resistance. Keep the step clean and check the grip tape periodically.
Route 3: Simple Repairs & Upgrades for Existing RV Steps
Sometimes, a full replacement or a DIY build isn't necessary. Small tweaks can make a big difference.
- Tightening Loose Hardware: This is the easiest fix. Use the correct wrench or screwdriver to snug up any loose bolts or screws on your step hinges, linkages, or mounting points.
- Replacing Worn Step Treads: Many RV steps have removable or replaceable non-slip treads. If yours are worn smooth, consider buying replacements or applying new grip tape over them.
- Adding Supplemental Portable Steps: If your RV's built-in steps are still a bit too high for comfort, a sturdy portable step (folding aluminum or plastic) can bridge the gap, particularly useful for children or pets.
- Lubricating Moving Parts: For folding steps, a periodic spray of silicone lubricant on hinges and pivot points will prevent squeaks and ensure smooth operation.
Choosing the Right Sealant for Your RV
Whether installing new steps or sealing existing components, the right sealant is crucial. Always use an exterior-grade, UV-resistant sealant specifically designed for RVs. These sealants are formulated to withstand extreme temperatures, harsh UV rays, and constant vibration without cracking, shrinking, or losing adhesion. Silicone-based or polyurethane sealants are common choices, but always check compatibility with your RV's materials. Proper application—on a clean, dry surface—is key to preventing water intrusion and protecting your RV's frame from corrosion and rot.
Safety First: Always!
No matter which route you choose, safety should always be your top priority.
- Personal Protective Equipment (PPE): Always wear safety glasses to protect your eyes from flying debris, and gloves to protect your hands.
- Stable Ground: Work on a level, stable surface. If you're working under the RV, ensure it's properly chocked and supported.
- Helper for Heavy Lifting: Modern step units can be heavy and awkward. Don't hesitate to ask for help when lifting and positioning them to avoid injury.
- Checking Structural Integrity: Before mounting anything new, always ensure the RV's frame or floor structure where the steps attach is sound, free of rust, rot, or damage. Reinforce if necessary.
Final Thoughts: Step Up Your RV Experience
Mastering RV step installation, replacement, and DIY projects might seem daunting at first, but with a clear plan, the right tools, and a commitment to safety, you can significantly enhance your RV's functionality and your overall travel comfort. Whether you're upgrading to a state-of-the-art system, crafting a custom solution, or simply making a few smart repairs, your efforts will pay off every time you confidently step into your home on wheels. Happy travels!